Check Stub Designer - Payroll
Create your company’s own check stubs with the Check Stub Designer. This design tool allows you to start with a simple design template, and add fields of date to the stub in the location of your choice. Virtually any field of data can be included on the check stub. Preview the check stub as you design it with the click of a button. Once completed, the check stub can be saved for later use. Create and save as many check stub variations as you like.
The check stub designer has three sections; Header, Detail, and Footer. The Header/Footer sections will print once per check stub. The Footer section will print at the end of the Detail section. The Detail section will be repeated for each earning detail displayed on the stub when it prints.
System-Supplied Check Stub Forms
Red Wing Software supplies you with a list of available check stub forms that have been saved. System-supplied check stub forms appear in blue and cannot be overwritten, however they can be edited and then saved as a different name. The examples below will use the Standard check stub form. Select File > Open or click the Open icon to display the list of available check forms (when the Check Stub Forms Designer is open, there will be two File menus, select the lower File menu).

To save the system-supplied check stub as your own check stub, select File > Save As, enter the name of the invoice, and then click Save.
Check Stub Settings
To set the number of lines that will print on a check stub before an overflow sheet is generated, select File > Settings.
Under Max Lines Before Overflow, select the number of lines for the Small Stub (used when multiple check stubs are on a form) or Large Stub (used when one check stub is on a form).
You can also set the way the detail will be summarized on the Check Stub Settings screen under Summarize by. By default, the detail is summarized by Earning and Rate which means that you will see one line for each unique combination of earning and rate on a check. Selecting other options will break-down the stub detail further, for example; you may want to see a break-down by the departments the employee worked in. Note: When YTD amounts are calculated for the stub, Rate is not included in the break-down, even if it is selected on this screen. This is because over time Rate could fluctuate depending on the earning, i.e. Commission. Breaking down YTD by Rate could quickly result in much detail being printed on the stub which could be the result in more frequent use of overflow sheets.
Under Other, clear the Include Year-To-Date Earning Detail check box to remove year-to-date earning payment detail information from the check stub. If you use a number of different earnings over the course of a ear, this may reduce/eliminate overflow sheets. Note: This does not affect year-to-date earning totals.
Data Fields
Data fields that can be used to design your check stub display on the upper-right side of the Check Stub Forms Designer screen. The fields that are available for placement and printing on a check stub are:
| Check Number | Pay Date | Earning Hours or Pieces | Deduction/Benefit (Abbreviation) | Deduction Amount (YTD) |
| Bank Account (Abbreviation) | Period From/To | Earning Amount | Deduction/Benefit | Benefit Amount (YTD) |
| Bank Account Name | Leave Category 1, 2, or 3 (Abbreviation) | Earning Department (Abbreviation) | Deduction Amount | Hours Offered Total (YTD) |
| Employer EIN | Leave Category 1, 2, or 3 | Earning Department | Benefit Amount | Gross Pay (YTD) |
| Company (Abbreviation) | Leave 1, 2, or 3 (Abbreviation) | Earning Project (Abbreviation) | Hours Offered Total | Deduction Total (YTD) |
| Company Name | Leave 1, 2, or 3 | Earning Project | Hours Total | Net Pay (YTD) |
| Company Address Line 1, 2, or 3 | Leave 1, 2, or 3 Accrued | Earning Project (Address) | Hours Total (Not Salary) | Direct Deposit Description 1-4 |
| Company Phone Number | Leave 1, 2, or 3, Used | Earning Production Center / Location (Abbreviation) | Pieces Total | Direct Deposit Account Amount 1-4 |
| Employee (Abbreviation) | Leave 1, 2, or 3 Available | Earning Production Center / Location | Average Hourly Rate | Direct Deposit Checking Total Amount |
| Employee Name | Earning Work Date (Timesheet) | Earning Profit Center (Abbreviation) | Gross Pay | Direct Deposit Savings Total Amount |
| Employee SSN | Earning (Abbreviation) | Earning Profit Center | Deduction Total | Memo Line |
| Pay Period | Earning | Earning Production Year/Series or Tracking Number 1/2 | Net Pay |
Custom Name Fields |
| Marital Status | Earning Rate | Earning Pay Default (Abbreviation) | Earning Hours (YTD) | Bilingual labels |
| Federal Exemptions | Earning Hours Offered | Earning Pay Default (Abbreviation) | Earning Hours (YTD Not Salary) | |
| Department (Abbreviation)/ Department | Earning Hours | Earning Pay Default | Earning Pieces (YTD) | |
| Pay Run Number | Earning Hours (Not Salary) | Earning Pay Default Custom 1-5 | Earning Amount (YTD) |
The Bilingual section lists the fields from the Translation Table in Setup > Payroll Details > Pay Stub Translations under Pay Stub Labels for each of the check stub fields listed above.
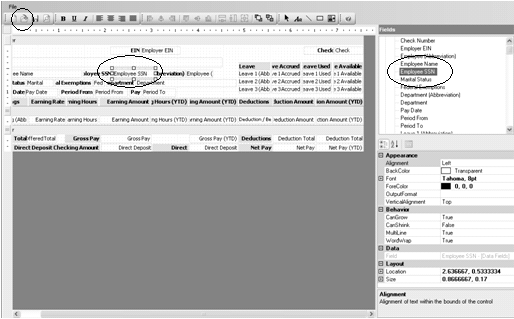
In the example below, the Employee SSN field is selected.
To include a field in your check stub form design, select the field on the upper-right side of the Check Stub Form Designer screen and continue to hold your left mouse button while you drag the field to the appropriate section of the check stub.
The size of a selected field can be changed by dragging the boundary of the box that displays around the field name on the check stub.
Properties for a selected field display on the lower-right side of the Check Stub Designer Forms Designer screen. In this example, the properties that are displayed are for the selected Employee SSN field.
Information About Specific Data Fields
- Direct Deposit Amount - If you intend to use a custom stub for direct deposit advices, you will need to include the Direct Deposit Amount fields on the custom stub. These fields will not print on checks, but will print on Direct Deposit Advices.
- Earning Work Date (Timesheet) - If you want to include the date an employee worked on the pay period stub line, include the Earning Work Date (Timesheet) field in your check stub form design. This Data Field represents the date for which a time sheet associated with an earning on the stub was entered. If the earning isn’t the result of a time sheet, the work date will not print on the stub. If you want to include the Earning Work Date (Timesheet) field on the check stub, you also need to select the Work Date (Timesheet) under Summarize by in Setup > Forms Design > Check Stub Form Designer > File > Settings so that the earnings are printed by work date. Only current earnings will display work date information, year-to-date information will not be summarized in this way. Year-to-date values will be displayed for each unique combination of summary fields excluding Work Date, in this example, Earning and Rate.
- Memo Line - If you want to include the Memo Line text entered in Pay Employees on your employees' pay stub, you must include the Memo Line data field on your selected check stub.
- Average Hourly Rate - The check stub designer includes two selections for Average Hourly Rate, one under Data Fields and one under Bilingual Labels. The Average Hourly Rate data field contains the sum of all current earning Amounts divided by the sum of all current earning Hours Worked.
Labels
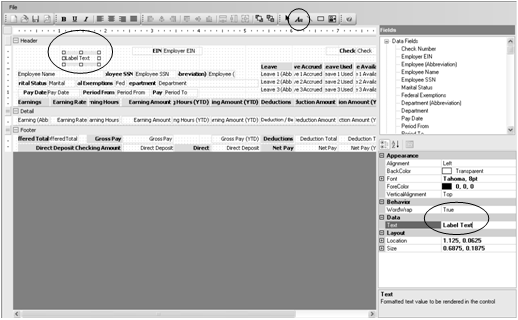
Additional labels that are not stored in the database, but will print on the check stub can be entered by clicking the Label icon ,drawing a boundary on your check stub by holding the left mouse button, and dragging the box that begins to display until the boundary is as large as you want the label, and then entering the text that you want the label to display in the Text property on the lower-right side of the screen. In the example below, a new label was added called Label Text.
Formatting Check Stubs
- To align a field to the left, select the field and click the Align Left icon
 . A field can also be aligned to the center, right, or justified by clicking the Center, Align Right, or Justify icons
  .
. - To align multiple fields horizontally to the left, select all of the fields by holding the CTRL key down while making the selections, and then clicking the Align Lefts icon
 . Fields can also be aligned horizontally to the center or right by selecting the fields and clicking the Align Centers or Align Rights icon
  .
. - To align multiple fields vertically to the top, select all of the fields by holding the CTRL key down while making the selections, and then clicking the Align Tops icon
 . Fields can also be aligned vertically to the center or bottom by selecting the fields and clicking the Align Middles or Align Bottoms icon
  .
. - To make multiple fields the same width, select the fields and click the Make Same Width icon
 . Fields can also be made the same height or size by clicking the Make Same Height or Make Same Size icons
  .
. - To add a line to your invoice, click the Line icon
 and then click on the invoice where you want the line to start and then drag to the location you want the line to end.
Preview and Print a Check Stub Form Design
To Preview the check stub, click the Preview icon 

Note: System-supplied forms are listed first, followed by any custom check stub forms in alphabetical order. The Print Check Number on Check, Print Social Security Number, and Print Hours Offered preferences are intended for use with the system-supplied stubs and will suppress labels on the stub if the Bilingual Labels have been used. If you want to turn these fields off on custom stubs, you should do so by editing the stub.